Ever wake up in the morning and find your bed is so cozy, it’s hard to even think about getting up? Does the thought of stepping onto cold tile make it even harder? What if instead of a cold shock to your system, your bathroom was warm and inviting and every step on the gently warmed tile slowly woke you up? That dream can easily become a reality with an underfloor radiant heating system in your bathroom.
The Benefits of Utilizing Heated Flooring in Bathrooms
Heated flooring systems are a great and economical way to save energy while making spaces more inviting. Heated flooring systems work especially well on tile installations since those types of flooring often feel cold to the touch. Radiant underfloor heating systems take those same properties of tile and turn it into a positive by using the tile to gently and evenly warm the entire room. Easy to install, economical to operate, and nearly maintenance-free, heated flooring adds value to any bathroom installation.
Hot air rises but duct work is typically located in the ceiling. This presents a problem for traditional heating systems. The forced air system must heat the air and then force it into the room so it mixes before naturally rising back to the ceiling. Underfloor heating systems work differently. Since they are inherently heating from the ground up, the heat goes where it is needed. Since the entire floor is being heated, the heating is more even too.
The temperature of the air and the amount of heat being radiated toward their skin are the two main factors that cause people to feel warm or cold. The Sun is a great example of what it feels like for heat to be radiated. Even when the air is cold, feeling the sunlight on your skin can warm you up. Using a radiant heating system under tile heats people in the same type of way.
In a room with heated tile, the tile is able to radiate heat to anyone in the room. This gives the person a more even and comfortable feeling of warmth even when the air temperature is lower. When the entire tile floor has a radiant heating system, people feel more evenly warmed since the heat is radiated from all directions. Because of this even, gentle heating, the temperature of the air can often be lowered by 6 degrees or more with people still feeling comfortable.
How to Install Heated Floors in a Bathroom
Underfloor radiant heating systems are a great way to make bathrooms more comfortable and are also designed to be incredibly easy to install. Warmup offers multiple solutions to make underfloor heating installation simple and economical.
1. Measure the Bathroom Floor
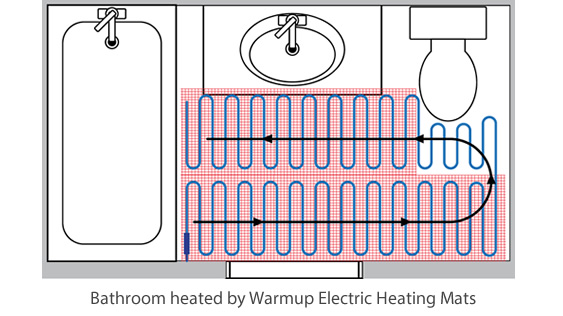
Determine how much of the bathroom floor will be heated. Make a diagram of the bathroom to ensure you have enough material. Don’t include permanent fixtures like vanities, toilets, showers, or tubs. The key is to determine how much floor area needs to be heated. As with most things, getting accurate measurements in this step can save you a ton of time later.
2. Acquire Materials and the Necessary Tools
Having all the needed materials and tools is essential to a smooth installation. Check that you have everything you need before beginning work:
- Undertile Heating Mats according to measurements
- Thermostat with floor sensor
- Digital multimeter
- Permanent marker
- Measuring tape
- Tape
- Scissors
3. Test the Undertile Heating Mats
Before installation, check that the floor heating system is in good condition. Using a digital ohmmeter, measure the resistance of the heating wires. The resistance should be within 15% of the resistance listed on the tag or in the manual for that model.
4. Inspect and Clean the Bathroom Subfloor
For a good installation, the subfloor needs to be clean and free of debris. Take your time on this step. Good preparation is key.
Remove any nails or sharp objects that can damage the underfloor heating system. If the subfloor is concrete, adhere a cork or synthetic cork underlayment to the subfloor before installing the heating system. Without the cork, the underfloor heating system will be heating the foundation as well as the bathroom, which will just waste energy.
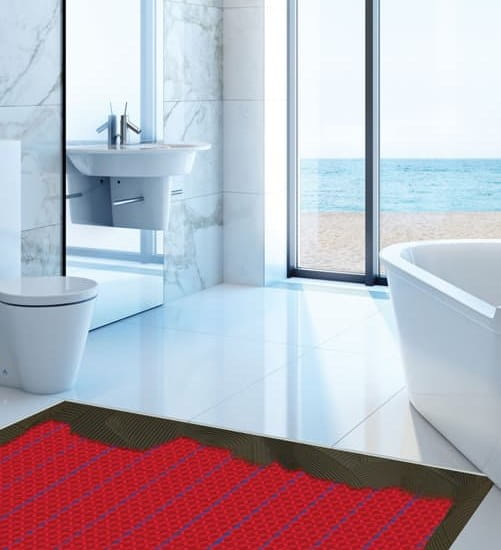
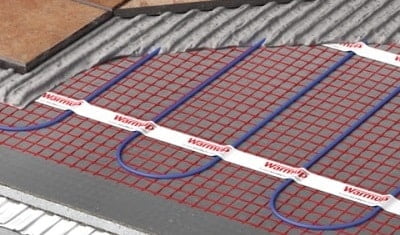
5. Install the Undertile Heating Mats
Installing the underfloor heating mats is actually the easiest part. Unroll the mat across the subfloor using tape or hot glue to hold the mat in place. Cut the mesh as needed to fit into the space, but be sure not to cut the heating element. Cutting the heating element will damage the system.
To fit the mat around tricky obstructions like columns and toilets, cut the wire away from the mesh and freeform the heating element to fit. Careful planning and preparation makes this step a breeze.
6. Position the Sensor
Now that the system is completely laid out and installed, place the sensor for the thermostat. The temperature sensor is what lets the thermostat know if it should send more or less power to the heating elements so be sure to place the sensor in a good location.
Ensure that the sensor goes between the heating elements and does not overlap them. Weave the sensor into the mesh or use hot glue to keep it from moving around. Good placement of the sensor will keep the thermostat working just like it should.
7. Test the System Once More
The underfloor heating system should now be completely installed. Check that everything is working properly before installing the tile. The ohmmeter should still read that the system’s resistance is within range. If not, fix the problem now while everything is still easily accessible.
8. Connect the Thermostat
Check with local codes and requirements before doing any electrical work. The system is now ready to be connected to the thermostat, preferably by a licensed electrician. Since underfloor heating systems may require significant amperage during warm up and to prevent tripping the thermostat’s GFCI, it is recommended that the underfloor heating system be put on a dedicated circuit.
After connecting the underfloor heating system, temperature sensor, and line voltage to the thermostat, the system is ready to be tested. With everything connected and working properly, the tile flooring can be installed. Check with the tile manufacturer to make sure that the tiles are compatible with underfloor heating systems but this is usually not an issue since most tiles will work great with underfloor heating systems.
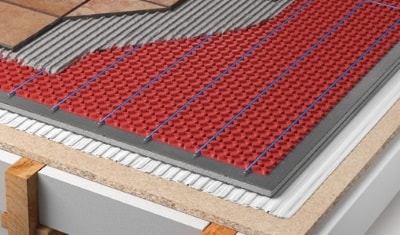
9. Install Tile with Modified or Unmodified Thinset
Bathroom tile installation is essentially the same at this point. To begin the tile install, apply a layer of modified thinset over the heating elements and mesh and install the tile. Install the tile as normal including using mechanical systems to prevent lippage. When the thinset has cured and the flooring is stable, your underfloor heating system is ready for use.
Make Your Bathroom With Heated Floors Even Better with Towel Warmers
Take your newly floor-heated bathroom to the next level with heated towel warmers. With no liquid inside, the single or multi-towel warmers are a simple and elegant solution and extremely inexpensive to run. While installing your radiant heated floors, consider adding this great addition.
Warmup Offers the Best Radiant Floor Heating Solutions for Bathroom Floors
Wake up easy with warm and inviting bathroom tiles powered by Warmup. Warmup’s easy to install system makes adding underfloor heating simple and economical for any tile installation. To get a quote and learn more about their bathroom tile underfloor heating systems, contact Warmup today.